TAPI and Acquaint integration
1. Install the TAPI driver for your phone system on the PC where you want to use Acquaint.
This is typically done by a telephone engineer or IT technician who is familiar with your phone system
2. Once the TAPI driver is installed, open the Windows Control Panel and navigate to the Phone and Modem settings.
You should see your TAPI driver listed here.
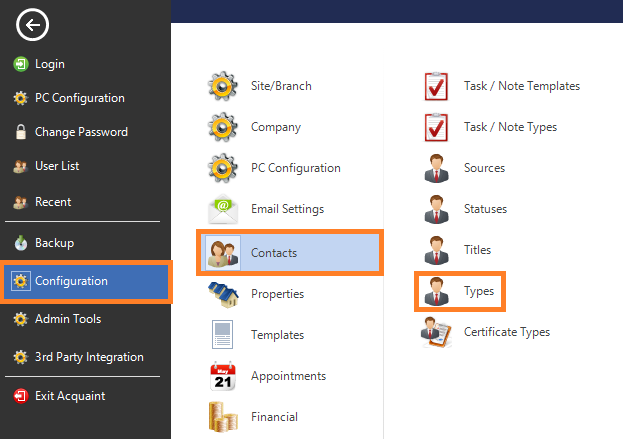
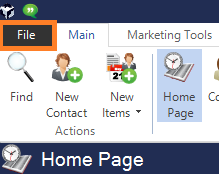
3. Open Acquaint and go to the File -> Configuration menu. Click on the “PC Configuration” option.
4. In the PC Configuration window, select the “Settings” tab.
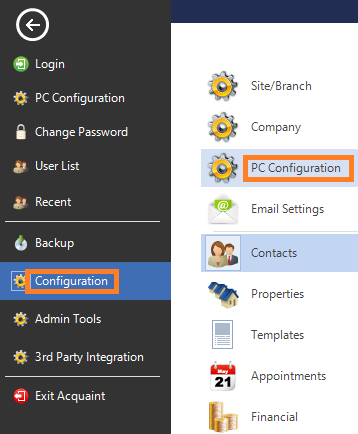
5. Under the “Telephony TAPI Driver” section, select the TAPI driver that you installed in step 1.
6. Click “OK” to close the PC Configuration window.
7. Exit Acquaint and then restart it to apply the changes.

Once Acquaint is configured to use your TAPI driver, you should see phone icons next to the mobile, home, and business telephone numbers fields on the Contact screen. You can use these icons to initiate an outgoing call. Incoming calls will also be detected by Acquaint and you will receive a desktop alert with the caller’s information. The Call Log screen will show a history of all incoming and outgoing calls, and the Current Calls screen will show all active phone calls with the name of the contact and the current duration of the call.
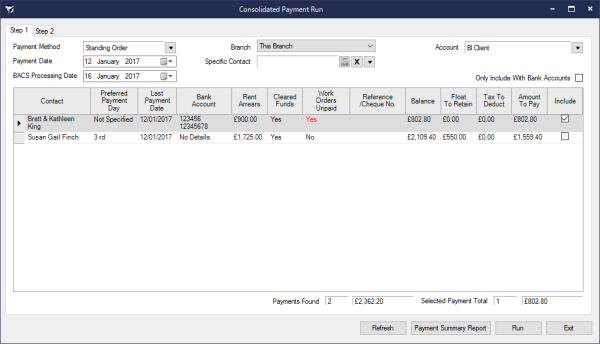
Consolidated Payment run
Process and Functionality Overview
- Tick ‘Consolidated Payments’ in Landlord account to unify all properties into one data flow, enabling you to view all properties in one statement.
- Once you enable ‘Consolidated Payments’, create statements as usual. However, note that the process is irreversible.
Payment
The screen displays Contacts with Consolidated Payments enabled and can be accessed from the ‘Consolidated Payment Run’ button or ‘Consolidated Payments’ Home Page Reminder.
Result

Automated bulk payments with a bank.
Set OIN Number
File > Configuration >Company > System Configuration > Payment Export > OIN

Set SEPA Format
File > Configuration > Site > Payment Export > File Format

Export SEPA File
Export file > Insert it into your Bank App

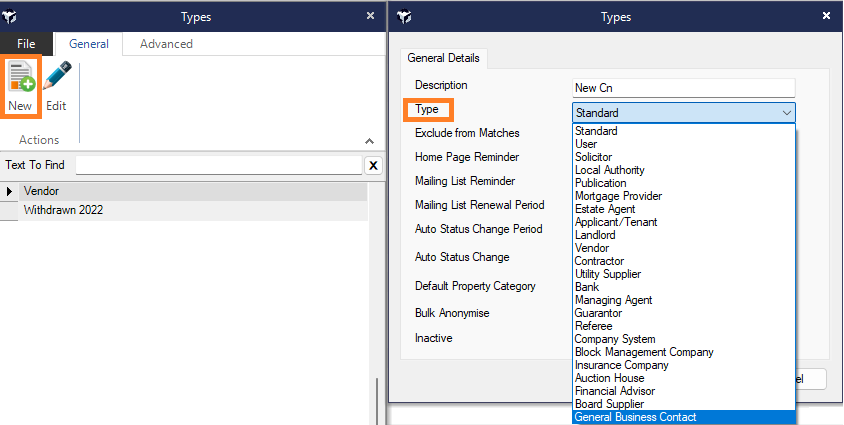
Custom contact type
Currency settings €
Check your Windows settings (the most common cause of the problem)
Settings > Region > Ireland

Check Acquaint
File > Configuration > Site/Branch > Site Details > Currency > Euro

Signable credit
BULK Purchase
Contact Brigtlogic directly
+44 1491 824800
- tell them your request for every branch
SEPARATE Purchase
Acquaint
Help > Purchase credit
Website
Pick option > Pay it
Bank accounts & transfers


1. Set Bank Accounts in system configuration I.
File > Configuration > Financial > Bank Accounts

2. Set Bank Account in company record II.
File > Configuration > Company > User Settings > System Configuration > Bank Accounts

3. Change invoice footer
File > Configuration > Company > User Settings > System Configuration > Financial

4. Change transaction bank account
Account > Edit transaction > Bank Account
FICO Approval
Under More Details of the landlord record, you can add in the either the Overseas Tax Deduction option (Blue) OR
Overseas Approval Number (Red). They cannot set both.

Available property
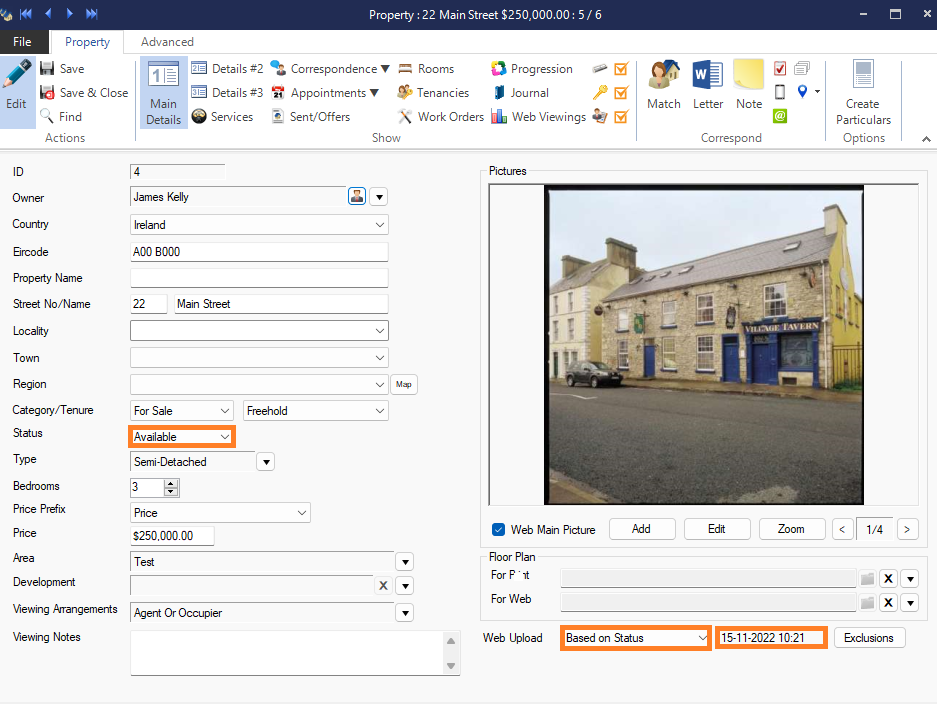
Conditions
1. Status is set as available
2. Web Upload: is Based on status/Just on my website
3. Web Upload: has set upload date
4. Eircode: is set, if property is new set Age category: as modern in details #3
5. Property description: Brief and Full are filled in details #2
+ Verify validity of energy certificate
If conditions aren’t met property won’t be available on websites, and property feedback link won’t be available too.
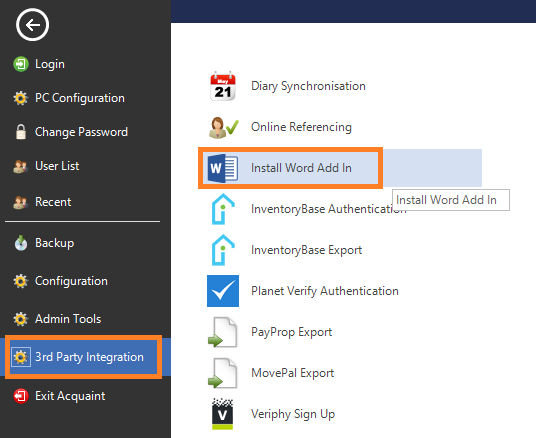
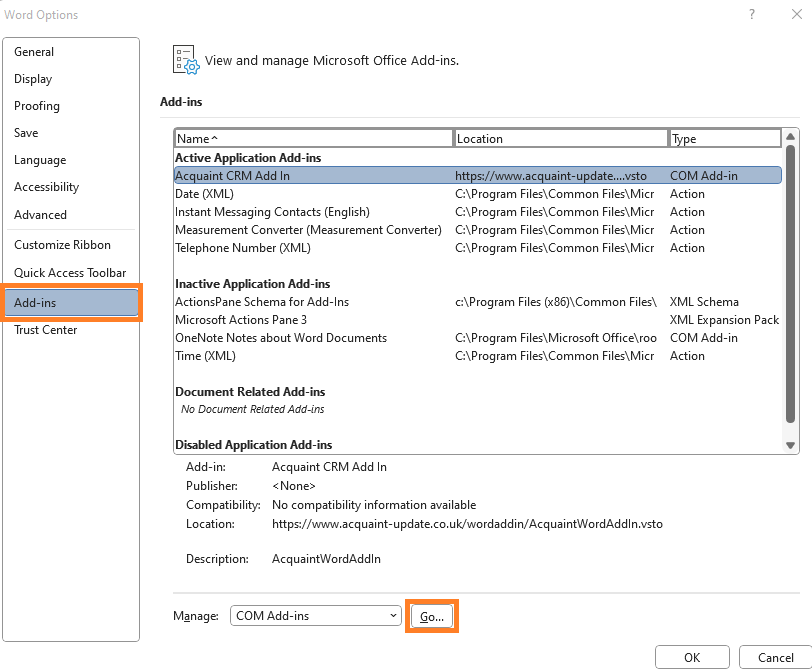
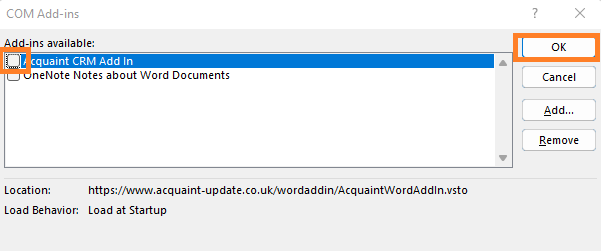
Install and Toggle Acquaint Add-in from MS Office

Change property status


VPN
Stands for “Virtual Private Network.” A VPN is a service that provides secure, anonymous Internet access. It “tunnels” your Internet connection from your ISP through one or more VPN servers, which hides your actual IP address and location.
Besides obfuscating your IP address, most VPNs encrypt your connection to provide extra security. The encryption encodes all data you send and receive, ensuring no one can eavesdrop on your Internet activity.
While fast VPNs can process and encrypt data in near real-time, it still requires an extra step, which means it may affect your Internet speed.
Most VPNs work with both desktop and mobile devices. Some VPN services are free to use, but the highest-quality ones charge a monthly fee. Generally, paid VPNs are faster and more reliable than free ones. Examples of VPN providers include:
- NordVPN
- ExpressVPN
- CyberGhost
- Surfshark
- ProtonVPN
NOTE: Businesses may also create private VPNs that employees must use to remotely access sensitive data. Company-specific VPNs typically require authentication, encrypt all connections, and limit the Internet locations users can access.
Link contacts


Unable to cast COM object of type error
The reason why you get this error is that you have two versions of the same program on your device.
The first is Microsoft 365 the second is a pre-installed version of Office which causes the problem and which you have to get rid of.
1. Find the package
Hit windows button
write down Add or remove programs
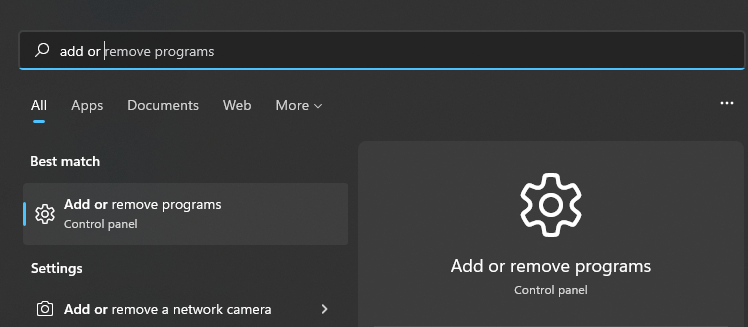
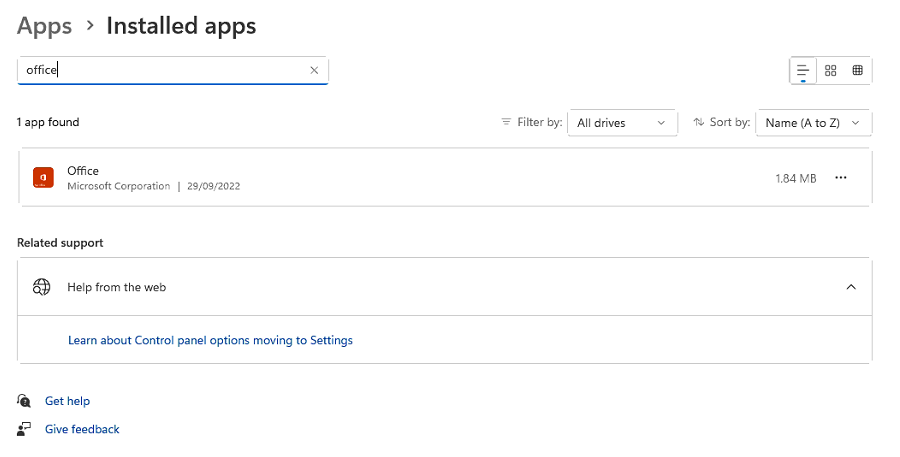
2. Uninstall package
Uninstall preinstalled office package
this is not main Microsoft office
COM error is caused by conflict between two versions
and you need to get rid of that one
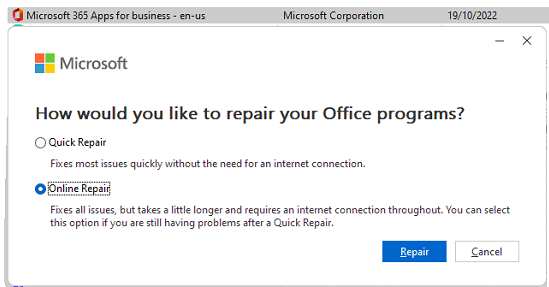
3. Microsoft 365 Online repair
From control panel enter your programs
find Microsoft 365 right click on that > change
choose online repair


4. Restart the Device

Certificate settings
Insert Certificate
Path:
Certificate List > Menu > New
Fill Form
Attach Certificate

Delete Certificate
Delete every message from correspondence,
than you will be able to delete certificate

Set Certificate Duration
Path:
File > Configuration > Contacts > Certificate Types
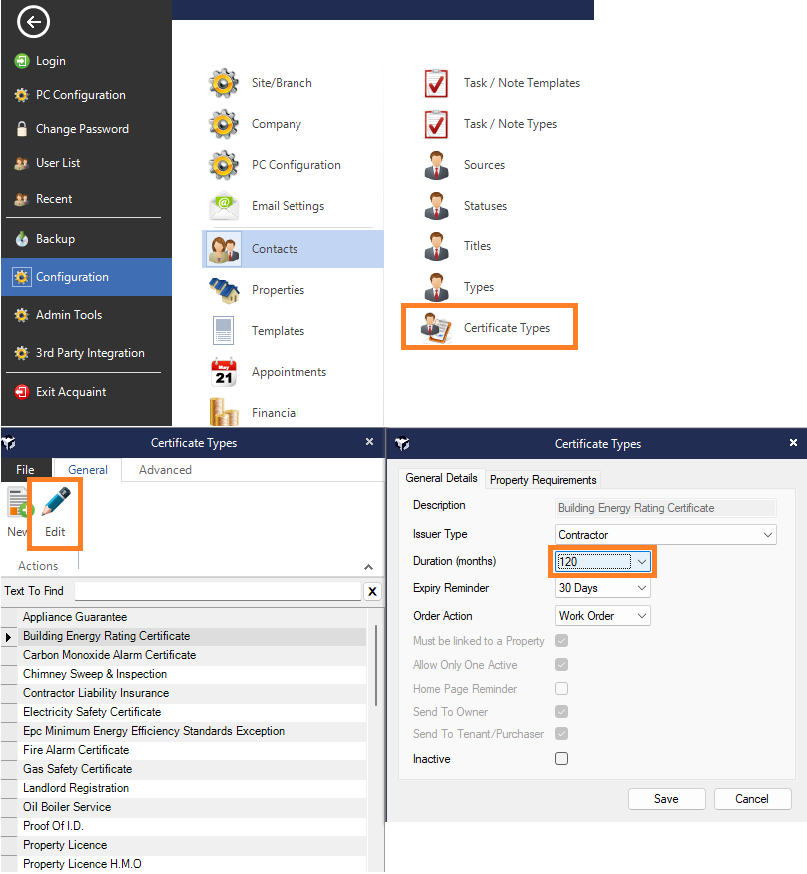
Set Certificate Expiry Reminder

Calendar Authentication
DISCLAIMER: Please note that the 4PM company is responsible for syncing the Acquaint system with the Agency Calendar, while the Agent is responsible for syncing their Mobile Calendar with the Agency Calendar.
1. Log in Browser


2. Set Email in System
3. Set Email in Record
4. Auth Diary
Enter user record, then user settings
Choose calendar provider
Choose to what detail you want to synchronize appointments
after the selection is complete, click on Authenticate

5. Create Appointment in ACQ Diary
6. Check Appointment in Agency Diary
Behind Diary Authentication
1. Synchronize diary
it generates token file in users folder in Acquaint
2. Create appointment
Acquaint generates token file
if token is valid, Acquaint will synchronize data to MS, Google diary
*Invalid token: email is not synchronized properly, acquaint is not connected to drive
File Path
Upload file into drive
Path:
This PC > Acquaint Drive > Documents or Templates Folder > Insert File
Connect file to Acquaint
Path:
Marketing Tools > Letter > New or edit > Set File Path > Save
Visual guide

Letter Of Engagement

Signable and Merge fields
Insert merge field into document

WHOLE STEPS
Choose document for change

Acquaint Add-ins

Merge field search box

Example
New User

Create new contact record
Hit New contact button
It will automatically create blank contact record

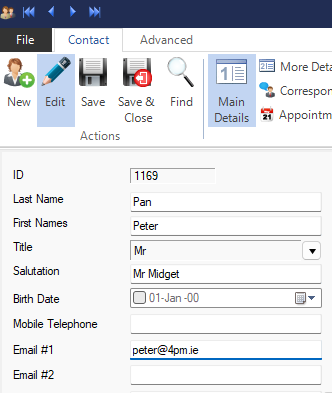
Insert details of contact
Set basic contact details:
Name, Title
Company telephone, email
Set contact type and status
Current – Active employee
Expired – Former employee

Login Details
In user settings set preferred username and password of user
you can also synchronize his calendar with acquaint
before that you need to synchronize contacts email

Financial and Other Reports

Pre-crated reports

Custom reports
Choose Report type

Set report parameters

Report example

Letterhead Settings
1. Edit Letterhead
Path:
Menu > Marketing Tools > Letterhead
Edit Default letterhead with new file (*recommended one)
or create brand new

2. Set Letterhead for specific purposes
Path:
Company record > Advanced > System configuration
Set letterhead for all letters in General Letterhead settings
or in Invoice Letterhead for invoice headers

Process email folder

Path
File > Configuration > PC Configuration
Pick folder that you want to synchronize,
In Process Outlook Emails area, hit add button
if you want to synchronize more folders repeat it multiple times.
Set Cut Off Date where you will set from which date messages will be uploaded
Change will be processed until one hour
Acquaint: PC Configuration window

Installing Acquaint
Install Software
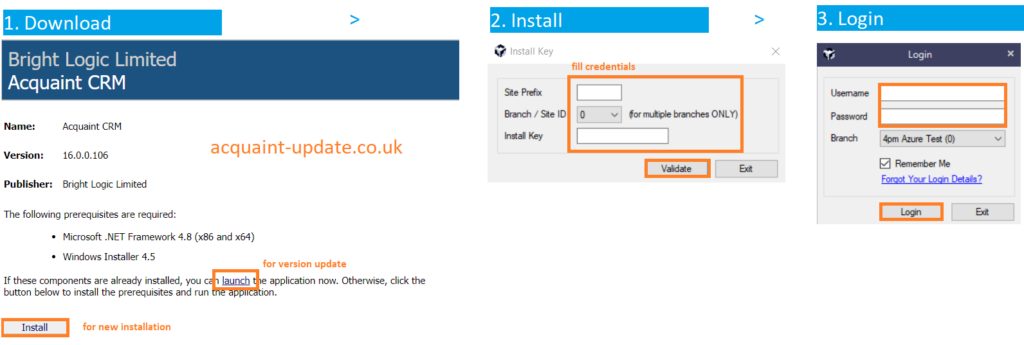
Download file
http://acquaint-update.co.uk/
Insert Install keys
It will be received from Acquaint support
Insert Contact Credentials
Contact record will be created by current employee
Video Guide
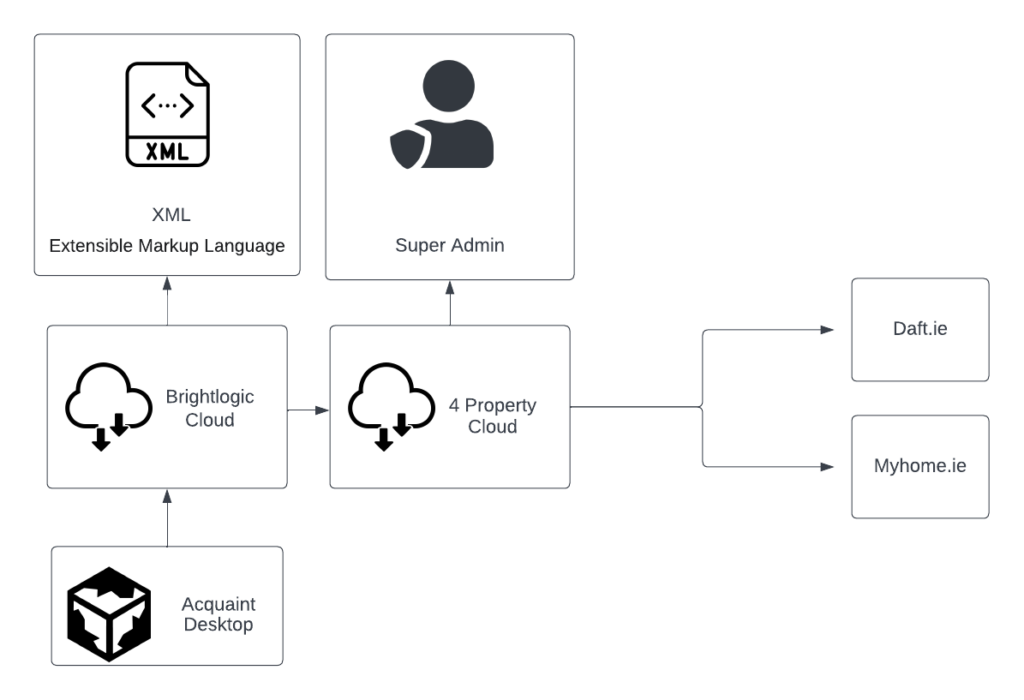
Feed transparency

Upload Email Signature Images


Email Authentication

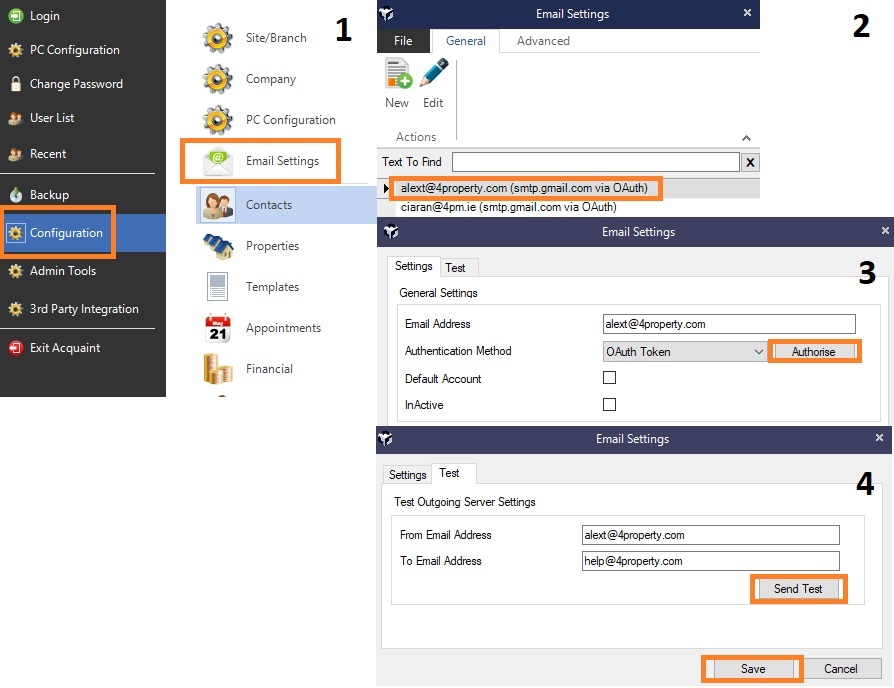
Instructions for Setting up Email in Acquaint
To set up email in Acquaint, go to File > Configuration > Email Settings.
Then, add a new email address or edit the current one.
Remember to test the outgoing server settings after completing the operation.
Ensure that you are logged in with the same email you are trying to authenticate in your browser.
You may need to change the account you’re logged in with before adding it to Acquaint.
Request for SMTP Settings for Non-OAuth 2.0 Email Provider
If your email provider doesn’t support OAuth 2.0, you can ask them for SMTP settings,
which should include the necessary details for setting up email service.

Video Guide
Delete Transaction
8-3 Tax Return to be filed by all Letting Agents
As I’m sure you’re all aware, letting agents are obliged to file an 8-3 return under self-assessment each year (without being requested by Revenue), at the time of filing your Corporation Tax return. This return gives details of all property owners, properties and rental income for the year.
The good news is that Acquaint can run this report for you at the touch of a button!
Just click on the Financial tab and choose “Produce Form 8-3”.


Please note the following requirements that were brought in since 2020:
- PPS number of all property owners
(insert into the PPS field in Acquaint – Contact/More details);
- LPT number of all let properties
(insert into the LPT field in Acquaint – Property/Details#3); and
- Total amount for the accounting period.
Form Example

TOP TIP:
When you have a new landlord or property – ensure you request the LPT and PPS at the start of each engagement, and update Acquaint for the details.
This will be required for let only properties as well as managed properties.
All estate agents have a statutory requirement to keep the client account fully reconciled throughout the year. The best approach towards meeting these requirements is to use Acquaint to manage your client account transactions.
Correctly mapped drive

1. VPN
on VPN icon r-click and connect
wait until icon became green.

If icon is not available
hit windows button write down open VPN and open the app
it will make icon available

2. Acquaint
Run Acquaint
3. Verify Connection

Bulk Payment File – Setup
Acquaint has the ability to create a bulk payment file that allows you to pay all landlords or contractors in bulk rather than one by one in your bank.
The increase in efficiency in processing rent is substantial when our clients have implemented this.
For example: If paying one landlord takes 3mins in the bank and you pay 50 landlords, this takes 150mins. You can upload one file in 3mins to pay these so that is 50x quicker.
Before we start :
- You should confirm with your bank that you have this facility first
- In most cases you will require an OIN from the bank
- You should be comfortable with processing transaction in Acq before setting this up
Step 1 – OIN
Here is how to add your OIN into Acquaint.
Step 2 – SEPA Format
Note: AIB is SEPA 1.0 and BOI is SEPA 1.1
Here is where to pick the correct SEPA format.
Step 3 – Add Bank Details
In order to be able to make these payments, you need to make sure that you enter the bank details for the contacts you are going to pay. Here is how to do this in Acquaint.
Note: These only has to be done once and is saved for all future payments
Step 3 – Generate the Bulk Payment File
Once the above is done you will be able to generate the bulk payment file. Here is how to do this in Acquaint.
You can check out our full suite of training videos. If you need any more guidance or if you have any questions, please don’t hesitate to email us on [email protected].
Useful Links: Latest articles and webinars | Request remote support
Bank Reconciliation – Webinar
Adding an Overseas Landlord
ACQUAINT FINANCIAL – PREPARING TO GO LIVE


When you decide to use the financial side of Acquaint for processing transactions and all the client account capabilities, please follow these steps to ensure you are fully prepared and the transition will be as smooth and hassle-free as possible.
Before we start…..
All transactions that you enter into Acquaint need to be against a contact and a property so before starting with the client account you will need to
- Add your contacts
- Add your properties
- Add your tenancies (lettings) , and offers (sales)
TIMELINE
Ensure you leave enough time to plan properly for going live. This will vary depending on your knowledge of Acquaint, the complexity and volume of your transactions, how much time you can spare etc. But as a general rule of thumb, allow 4-6 weeks.
Week 1 and 2 – get comfortable with processing transactions, including training and practicing transactions;
Week 3 and 4 – get training on bank reconciliations, and do full parallel run on all transactions;
Week 5 – get ready for going live;
Live date – old transactions are cleared, insert opening balances and start as you mean to go on!
WEEK 1-2 ENSURE YOU’RE COMFORTABLE WITH PROCESSING TRANSACTIONS
- Read the document “Acquaint Financial Processes”. This gives an overview of the steps you’ll need to take daily/weekly/quarterly to keep on top of everything.
- You need to be fully up to speed on the processing of all types of transactions and completely comfortable with them and with the way Acquaint works. If you’re not quite there yet – organise some training and allow a few weeks to practice them first.
- Initially, just choose just a few clients and replicate all the transactions for a week or two, comparing the transactions, statements etc. on Acquaint with your current records. Make some mistakes and learn how to correct them.
Helpful videos
WEEK 3-4 BANK RECONCILIATION PROCESS, FULL PARALLEL RUN
- Organise some training on completing bank reconciliations.
- Next step is to do a full parallel run, ideally for a few weeks, and compare to your current records. You should investigate anything different or unexpected and ensure you’re comfortable with fixing/deleting/editing transactions to ensure they are correct.
- This should include doing bank reconciliations for this period, running the bank account balance report, and investigating anything different or unusual.
Helpful Videos
WEEK 5 GOING LIVE
- Decide on the cut-off date
- At least a week before the cut-off date, look at the client account breakdown, make sure it ties to the bank and clear up any anomalies;
- Try to transfer all fees, maintenance charges etc. on the final day, to minimise the volume of opening balances you’ll need to input;
- Arrange in advance for 4Property to clear all transactions up to that date.
LIVE DATE
- Compile a full breakdown of the client account bank balances that need to be input into Acquaint;
- 4Property to clear all transactions;
- Then enter opening balances – follow this procedure:
PROCEDURE FOR INSERTING OPENING BALANCES
(i) Create one full list (preferably in Excel) of the breakdown of your client account as at the cut-off date, with a total figure that agrees to the bank account balance. This list should be further broken down by category (e.g. list of tenant deposits held, money due to landlord etc.), and should include Name, Property and Amount.
(ii) Update Acquaint with these balances in line with advice given by Acquaint support. Use the cut-off date as the transaction date for all balances.
(iii) Run a “bank account balance” report immediately for the cut-off date and ensure that it’s all correct, the total agrees, and there is no variance.
(iv) Do a bank reconciliation for this day, preferably with the help and guidance of Acquaint support. There should be no variance and no unreconciled items in Acquaint, of any kind.
(v) Then you can start inputting transactions (with transaction date after the cut-off date).
(vi) Do a bank reconciliation for the first full week (or shorter time period if there are a lot of transactions).
(viii) From then on, do a bank reconciliation every week and ensure that any unreconciled transactions are dealt with as soon as possible.
Word Add-in (don’t see tab)
Calculate Pro-Rata Rent
Did you know that Acquaint can calculate Pro-Rata rents?
Entering Details for Letter of Engagement
Adding Block Management Company and Block
Reporting (Contractor Payments)
Email all Landlords (requesting info for Form 8-3)
Letting agents and managers, including internet intermediaries, of premises must file a Form 8-3 return to Revenue. This return must contain details of payments relating to managed premises.
The Form 8-3 must be filed annually in conjunction with the annual Corporation Tax or Income Tax return.
The return must be filed through Revenue’s MyEnquiries in the myAccount facility under the category ‘Third party returns’.
Here is help guide on how to produce a google form to collect any outstanding data you require from your landlords!
Below is how to email all landlords in bulk to request the info from them through AcquaintCRM.
How to produce Form 8-3 for Revenue


Letting agents and managers, including internet intermediaries, of premises must file a Form 8-3 return to Revenue. This return must contain details of payments relating to managed premises.
The Form 8-3 must be filed annually in conjunction with the annual Corporation Tax or Income Tax return.
The return must be filed through Revenue’s MyEnquiries in the myAccount facility under the category ‘Third party returns’
Not to worry, your AcquaintCRM system already has the ability to pre-populate this form for you! Check out the video below…
Turn on VPN

Steps – Going live with Client Account


BEST PRACTICE TIMELINE
Ensure you leave enough time to plan properly for going live. This will vary depending on your knowledge of Acquaint, the complexity and volume of your transactions, how much time you can spare etc. But as a general rule of thumb, allow 4-6 weeks.
Step 1 (week 1-2)
Operational training with Ciaran and Eleanor, which includes processing transactions and running statements. Get comfortable with processing transactions, and how to correct mistakes etc.
Haven’t booked this in yet, click here
Step 2 (week 3-4)
Get first hour’s training on client account and bank reconciliations with Orla, then do a parallel run processing all transactions over a week or two, including completing your own bank reconciliations.
Haven’t booked this in yet, click here
Step 3 (week 4-5)
Prepare to go live. Agree cut-off date, prepare client balance breakdown on cut-off date.
This is the format you will need your opening balances in.
Step 4
Live date!
Old transactions are wiped, insert opening balances. Further training on doing the first live bank reconciliation, including the client bank account balance report to ensure all transactions are correct. Start as you mean to go on!
Acquaint Anywhere- Adding a contact
Automatic Responder

Undo Closing Statement

Generate a closing statement & invoice (Sales)
Undo a Bill

Changing the Owner of a Property
Undo Statement after Transfer Fees is Run

Editing Invoice/Receipt/Statement Footers
Generate Bulk Export File

Update Rent or Commission Amount

Renew/Extend a Tenancy
Adding a Letter Template
Paying a Charge
Undo a Statement, Receipt or Invoice
Unlinking a Split Transaction

Pay with Credit
Receive Payment
Adding Bank Account Details
Match and Market

Adding a Solicitor
Adding a BER
Webinar- New Homes

In our latest webinar, Ciaran discusses processing new homes on Acquaint.
The webinar covers:
-Setting up New Homes
-Copying Properties
-Generating New Homes Reports
Webinar- Financial Transactions

Our latest webinar focuses on Financial transactions, primarily
– Adding Charges
– Invoicing
-Paying Charges
-Adding Products
-Allocating Credits to Debits
-Undoing Transactions
Add Viewing Protocol Content into Emails
Acquaint – Sales Process
Add
a Vendor

Add a
Property

Generate
a Letter of Engagement
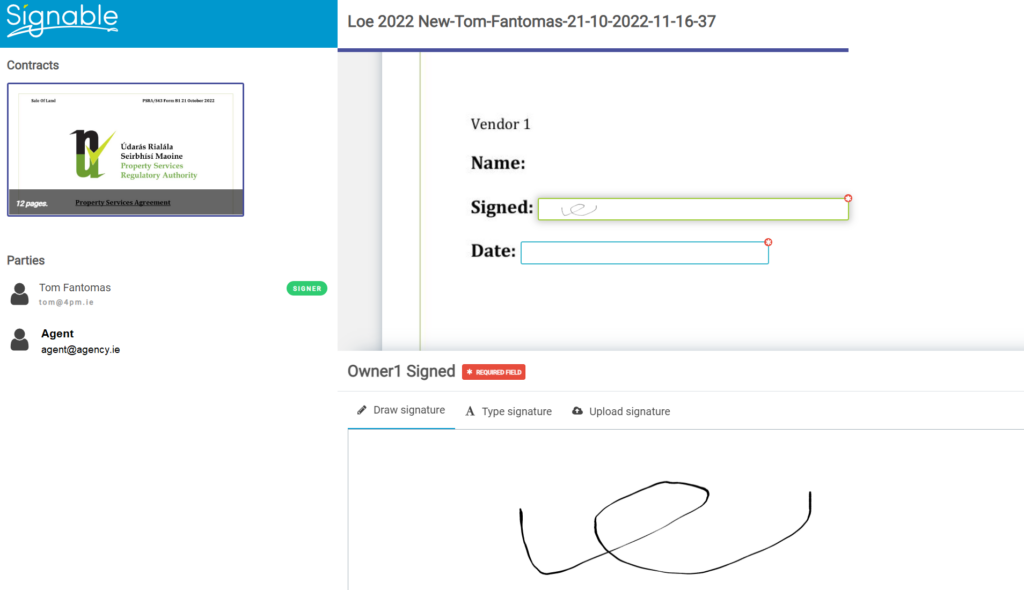
Get Letter of Engagement E – Signed
Acquaint is integrated with Signable which allows you to get your Letters of Enagagements/Leases and any docuement you wish esigned. See our help topic on this here.

Produce a
Brochure
Upload Property
Acquaint has the ability to upload your listings to various online sources such as Daft, MyHome, PropertyPal and also the likes of Facebook and Twitter. If you would like more info and setting these feeds up, contact us here.
Add Viewings
If you open up the diary page you will see all of your team’s calendars. If you click on a time slot, a list of appointment types will appear. Choose one and then you will need to add contacts and the property to this appointment.
You can then send confirmation emails to all attendees by clicking “send” down the bottom on that dialogue box. This will also jump into your Gmail/outlook calendar once you sync it here.
Log an
Offer
Receive a
Booking Deposit

Progression
Hopefully, this gives you a good idea of the basics of Acquaint. You can check out our full suite of training videos here. If you need any more guidance or if you have any questions, please don’t hesitate to email us on [email protected].
Acquaint – Daily Financial Process
Note: This may be a bi – weekly process if you don’t do a lot of management.

1. Look at
the Bank
The first step is to look at your physical bank account. Here is where you will see what monies have come in. Some people print this off or simply have it open on another screen. This makes it easier to start posting into Acquaint.
2. Post in Acquaint
Post rents received through the “Rent Due” screen or receive any booking deposits into the purchaser’s account.

3. Identify any
Unknown Transactions
You may get rent in without a reference so it is best to try identify these as soon as you can.
Top Tip : Share these transactions with the whole team and get them to help identify.
4. Record Cash and Cheques
It is best practice to have a shared spreadsheet to record cash/cheques to track what has been lodged and not.

5. Close and Bill
Work Orders
Once the job is completed and the contractor’s invoice has been submitted, you should move the status of the work order to “closed and billed”.
Note: Attach the contractor’s invoice either in correspondence or on the first page of closed/billed process.

6. Post any
Other Charges
If there are any other charges, make sure to post them against the relevant contacts in Acquaint (e.g. charging a landlord for a new washing machine).

7. Pay Landlords
in Acquaint
Once you have marked the rent as paid that landlord will appear in the “Landlords to pay” section. Tick the landlords you wish to pay and the date you actually paid them and then click “run”.
There is also an option to create a bulk payment file that will allow you to pay all landlords in seconds through the bank.
8. Pay Contractors
in Acquaint
After you have accepted rent and paid the landlord, funds are then available to pay the contractor.
Note: If using the bulk payment file, generate file and save on pc.
9. Pay any Solicitors
or Vendors
If you have closed off a sale and are going to pay the remainder of the deposit over to a Solicitor or Vendor today, then close off the sale in Acquaint.
10. Transfer Fees
in Acquaint
Once you have paid everyone who is due to be paid in Acquaint then you can run “Fees to Transfer” to take your own fees. Tick what fees you are taking and click “run”.
11. Run Cashing
Up Report
The cashing up report will show you all incoming and outgoing transactions to your client account for the dates you choose. This is a great report to print off before you make the transfers in your physical bank account.
12. Make Payments
in the Bank
The cashing up report will identify the payments you need to make to all clients, contractors, and what to transfer to your office account. Make these payments through your internet banking or upload the bulk payment file if you have this facility.
Financial Best Practice
We have created a financial best practice document covering daily, weekly, and quarterly processes. Click below to view.
You can check out our full suite of training videos. If you need any more guidance or if you have any questions, please don’t hesitate to email us on [email protected].
Useful Links: Latest articles and webinars | Request remote support
Acquaint – Rebranding Process
Note: Please send us an updated version of your new logo so we can update this for your database.

Changing
Site Details
Change
Letterhead
Update your
Brochure
Marketing Email
Designer
You can check out our full suite of training videos. If you need any more guidance or if you have any questions, please don’t hesitate to email us on [email protected].
Useful Links: Latest articles and webinars | Request remote support
Acquaint – Property Matching Process
Add Property
To start you must have the property record entered into Acquaint:
- Make sure the property has a price, picture and brief description at the very least.
- Only available properties can be matched to suitable applicants.
- The Area on the main details page is the area used to match.
Top Tip : Adding “New Homes” as a area group and your developments as areas will allow you to mark interest in applicants requirements.
See how to add add areas and area groups here.
Add Applicant’s Requirements
If you open an applicants record you will see a requirements tab. Here is where you can enter what they are looking for (area , price, bedrooms etc):
- Agree on a standard within the team ( e.g must at least fill in price, area, bedrooms).
- For commerical – floor area requirement is useful.
- For land – land area requirement is useful.
GDPR Marketing Preferences
You will be prompted to send a GDPR marketing preferences email to any new contact you enter into Acquaint (with an email address). This will ask them if it is ok to send them emails/sms/letters etc. Once they tick any of those boxes their profile in Acquiant updates automatically. Only contacts who have given you permission to email with be sent marketing emails.
Matching
from a Contact
Click Match on a contact and send them a branded email bulletin with suitable properties.
Matching from a Property
Click Match on a property and email that property to all suitable applicants.
Match and
Market
Click Match and Market and send all suitable properties to all suitable applicants. (who have not been sent that property before)
You can check out our full suite of training videos. If you need any more guidance or if you have any questions, please don’t hesitate to email us on [email protected].
Useful Links: Latest articles and webinars | Request remote support